SCIM provisioning
This feature is only available to organization owners and administrators.
SCIM (System for Cross-domain Identity Management) is a standard
protocol used by Single Sign-On (SSO) services and identity providers
to provision/deprovision user accounts and groups. Zulip supports SCIM
integration, both in Zulip Cloud and for self-hosted
Zulip servers. This page describes how to configure SCIM provisioning
for Zulip.
Zulip's SCIM integration has the following limitations:
- Provisioning Groups is not yet implemented.
- While Zulip's SCIM integration is generic, we've only fully
documented the setup process with the Okta and Microsoft EntraID
SCIM providers. Zulip support is happy to
help customers configure this integration with SCIM providers that
do not yet have detailed self-service documentation on this page.
Zulip Cloud customers who wish to use this feature must upgrade to
the Zulip Cloud Plus plan.
-
Make sure your Zulip Cloud organization is on the Zulip Cloud
Plus plan.
-
Contact support@zulip.com to request the
Bearer token that Okta will use to authenticate to your SCIM API.
-
In your Okta Dashboard, go to Applications, and select
Browse App Catalog.
-
Search for SCIM and select SCIM 2.0 Test App (Header Auth).
-
Click Add and choose your Application label. For example, you can
name it "Zulip SCIM".
-
Continue to Sign-On Options. Leave the SAML options as they are.
This type of Okta application doesn't actually support SAML authentication,
and you'll need to set up a separate Okta app to activate SAML for your Zulip
organization.
-
In Credentials Details, specify the following fields:
- Application username format:
Email
- Update application username on:
Create and update
-
In the Provisioning tab, click Configure API Integration, check the
Enable API integration checkbox, and specify the following fields:
- Base URL:
yourorganization.zulipchat.com/scim/v2
- API token:
Bearer <token> (given to you by Zulip support)
When you proceed to the next step, Okta will verify that these details are
correct by making a SCIM request to the Zulip server.
-
Enable the following Provisioning to App settings:
- Create Users
- Update User Attributes
- Deactivate Users
-
Remove all attributes in Attribute Mappings, except for the following:
- userName
- givenName
- familyName
-
Optional: If you'd like to also sync user role,
you can do it by adding a custom attribute in Okta. Go to the Profile Editor,
click into the entry of the SCIM app you've just set up and Add Attribute.
Configure the following:
- Data type:
string
- Variable name:
role
- External name:
role
- External namespace:
urn:ietf:params:scim:schemas:core:2.0:User
With the attribute added, you will now be able to set it for your users directly
or configure an appropriate Attribute mapping in the app's Provisioning
section.
The valid values are: owner, administrator, moderator, member, guest.
-
Now that the integration is ready to manage Zulip user accounts, assign
users to the SCIM app.
- When you assign a user, Okta will check if the account exists in your
Zulip organization. If it doesn't, the account will be created.
- Changes to the user's email or name in Okta will automatically cause the
Zulip account to be updated accordingly.
- Unassigning a user from the app will deactivate their Zulip account.
-
Make sure your Zulip Cloud organization is on the Zulip Cloud
Plus plan.
-
Contact support@zulip.com to request the
Secret Token that Entra will use to authenticate to your SCIM API.
-
Sign in to the Microsoft Entra admin center.
-
Go to Identity -> Applications -> Enterprise applications.
-
Select New application -> Create your own application.
-
Complete the form:
- Enter a name for your application.
- Select the option Integrate any other application you don't find in the gallery.
- Click Add to create the new app. It will be added to your Enterprise applications.
-
Continue to the app's management screen and click Provisioning in the left panel.
-
In the Provisioning Mode menu, select Automatic and specify the following fields:
- Tenant URL:
http://yourorganization.zulipchat.com/scim/v2/?aadOptscim062020.
The ?aadOptscim062020 part of it is a feature flag
that needs to be added to ensure SCIM compliance by Entra ID.
- Secret Token:
<token> (given to you by Zulip support)
-
Click Test Connection.
-
In the Mappings section, there are two sets of attribute
mappings: one for Users and one for
Groups. Make sure to set Provision Microsoft Entra ID Groups to
be disabled. Provisioning of Groups is currently not supported in
Zulip.
-
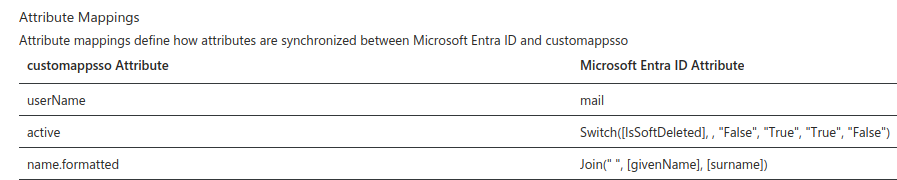
In Provision Microsoft Entra ID Users, configure the necessary mappings:
- Change userName to map to mail. Important: You need
mail to be set for all your users or trying to assign them
to the app will fail.
- Delete the other default entries leaving only the active and
name.formatted mappings, until your list looks like the
image below.
-
Once your configuration is complete, set the Provisioning
Status to On and then click Save to start the Microsoft
Entra provisioning service.
-
Now you can proceed to the Users and groups tab, where you can
assign users to be provisioned via this integration.
-
Wait for the initial provisioning cycle to be started by
Entra. This might take up to 40 minutes. This delay is entirely
inside Entra, and not under Zulip’s control. You can also use
Provision on demand in Entra to cause
immediate SCIM provisioning for specific users, which is handy when
testing the integration.
Related articles